0:00
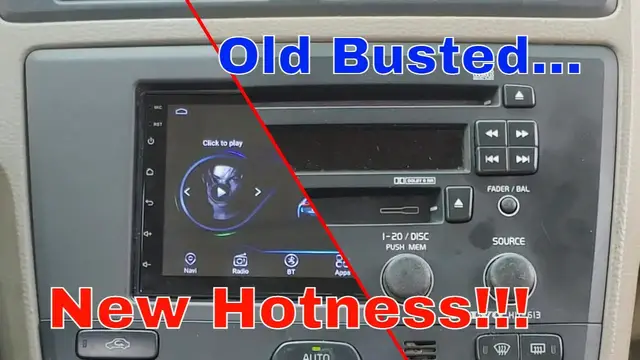
That is so old school. It is. So we're going to replace this radio, this car, Volvo, with this radio. Sorry the box doesn't look that great. They have pretty pictures on it. I guess that's to save money. But it's right here. It's awesome
0:20
and we're going to install this. We're going to show you how we take this out of the dash
0:26
So if you have a Volvo, you might want to stay tuned to that
0:31
And we're also going to show you how we wire up this radio and things like that, and the connectors we use
0:37
All the links will be left below, so you can check them out there. Well, he's going to show you guys
0:42
I didn't do any of it, you guys. I really didn't. I don't like cabbage
0:52
I don't like cabbage. It's a 16-inch fan. We're gonna mount it up
1:03
We're in a temperature switch. How do you keep wiping the Jeep? Yeah, you're sweating on everything
1:09
The whole floor, man. I can't set that in front. Okay, we didn't have to move the exhaust
1:14
We didn't have to jack up. We didn't have to do anything. Look at that. Okay, so what you get in the box with this radio is the radio
1:32
You'll notice, very slim. Has your connections on the back. It's a 10 amp fuse, so it's not going to make a lot of power
1:44
So, you know, 12 volts, 10 amps. that's 120 watts this thing could make possibly then over here these is your
1:55
speaker wires it comes with and your power cables and all your other wires
2:01
then it has a plug-in for your RCA a remote for your amp this blue wire down
2:08
here and some other wires so in and out cables almost looks like a stereo
2:15
receiver then you have your backup camera it's just a simple us i mean rca to a backup camera
2:25
two usb cables and your gps antenna which we're going to try and install then it has your two
2:35
brackets comes with i guess thank you for buying it and then this owner's manual which very poor
2:45
instructions as far as when you get to the wiring it's not existing it just shows your pin out
2:50
and it's in microtex and then you have your quality checklist so you can check off everything
2:59
you have they pre-checked it for you so they assume everything's here to wire this up to our
3:05
volvo of course we have this volvo specific wiring harness and then this antenna connection
3:14
that they have that is completely Volvo. I have never seen, you know, usually it's just this when
3:21
you're going to install a radio, but Volvo, you have to get that if you want radio. I'm also
3:29
for the wire connectors, I'm going to be using heat shrink buck connectors. You can use either
3:34
heat shrink buck connectors. They have solder buck connectors, but this is what I always use
3:42
This is what I prefer. You'll see it in the using this on our Jeep and our boat and other things
3:47
For your dash, I picked up this Volvo dash kit. Of course, this would be specific with your
3:54
install, but this is for a single din or double din so you can put this little tray down below and it comes apart
4:02
So strip these off. They've already got pre-beveled right here. So So you can pull these off, just hold on to it, and it should rip right where it was beveled
4:16
So you're not going to cut off wires. That's nice. But it looks like the color code when wiring this is color for color
4:28
So we'll just wire up one of these. we'll do a purple black and black
4:36
So you just pull off that one And I using these barrel connectors right here so I take and slide this on the reason why
4:51
I like these heat shrink barrel connectors is because I can come back and after I crimp them
4:58
heat shrink them and they don't they glue themselves let's give that a nice little tug
5:07
and if you see this was the black and purple let's see make sure this is not the black and purple
5:15
this is the solid purple you want to make sure you get your speaker wires
5:21
right or your bass will be all jacked up you're not going to win any SPLs with this radio but
5:29
you want as much bass as you can get Okay, so I put that in there and go ahead and squeeze that one down
5:52
Check it and then I'll go ahead and after I get all these done I'll heat shrink them
5:58
once you get all the wires connected take this heat gun that's drawn all over
6:05
the place and I'm gonna shrink it like that. Now I'll do the rest of these outside as Danielle will probably be
6:22
upset with me heating up the house like this. Okay so after we heat shrunk all
6:26
these outside so we wouldn't heat up the house. So they're still a little warm but
6:32
I did them all together so you see some of them sticking together but worked out
6:38
really good. So you got these all done there should be nothing moving. I can put
6:45
some coal over this if I wanted to. So when you're putting this all that
6:51
together, these little tabs on this go at the bottom for a Volvo
6:56
and then this is going to slide in here and it's going to give us a tight fit
7:03
okay so on this I did have to go around with the razor and scrape it out so I
7:09
could make the radio fit inside the bezel and I just scraped a little bit
7:15
there but it's in the old car but let's get this together and then we'll see how
7:24
looks and this is what it looks like installed so I put a screw down here and
7:30
I have a screw over here this is such a tight fit in there that's how much room
7:36
it has from behind I'm gonna go install this so the first thing you have to do
7:41
before installing your fancy radio is you have to disconnect your battery
7:48
After your battery is disconnected you want to take and pry this bottom piece out
7:55
Get that side, get that side. And you'll expose years worth of dirt
8:05
Then you take your hex after you use your flathead and you'll take out these screws
8:13
They're tight enough. Put these screws in a safe spot
8:25
I'm gonna throw mine on the floor. I guess it would be bad if it fell down in that hole
8:34
So with my back tires blocked, this in the gear I can actually pull out the AC controls
8:43
You just pull it up and then right above here you should be able to wedge it and pop it out
8:54
There's little clips. There! Holy crap that was hard! And it pops out of them clips right there
9:03
There's metal. So you won't break them. Then once you get this guy out, you have these clips in the back
9:14
You just take all this out and your cigarette wire. And it comes out
9:24
Cigarette wire is the hardest thing to get. Now you have your hex screws for the radio
9:36
And then your radio should pull out. And this thing is in there. And if you notice here
9:48
on the back we do not have the fancy radio. If you need the fancy wiring you have to get the fancy
10:02
wiring. And our radio is out. The radio we're shoving back in here will have
10:19
plenty of room. So now that we have the radio mounted in this little frame
10:26
dilly and that took a ton of work, you see I've got... this is where the
10:31
speaker and all the power cables plug in to all the wiring that we create which is basically these
10:38
two ends we're using the uh the backup camera camera it also has our uh our wi-fi and these
10:50
antennas right here this is our gps and this is our antenna we don't have a backup camera right
10:57
now but they do include the GPS module which is right here. So basically I'm
11:04
gonna install everything back in the reverse order. You want to be frosty or
11:08
warm if you're in a cold climate. We are in Florida so take and plug these cables
11:16
back in. So this goes to your cigarette lighter and then these only go in one
11:29
way. You have a bigger one goes in over here and then you have a smaller one
11:38
With that you can set that kind of where it goes like that. Now we're going to
11:45
plug in the radio so we're not going to install this yet because we want to test
11:51
all our wiring and stuff before we mount it in the dash but first I have to plug
11:56
this in and then I have to plug in the battery so this is our power cable I
12:04
mean our speaker cables and all that and this is our power and don't forget your
12:13
antenna if you like normal radio tunes. And the wiring harness worked great. Now this has a ton of room behind it now so
12:34
we shouldn't have any problems getting this thing in. Let's go ahead and mock it up
12:40
and make sure it fits. We'll leave that GPS cable out. Really cool like that
12:55
That's how it's gonna look right like that except without the GPS cable. Set that up
13:01
so we can test our GPS and there just has fingerprints on it lovely but that
13:12
looks a lot better apply power again you may get some sparks yep there's some
13:17
sparks most cars always draw power and then tighten this back up because if it
13:23
loosens up your car will not start so it works pretty good I have the YouTube
13:29
app up right now I'm gonna hit my wife's roasted vegetables here
13:36
Well I didn't do the soup chairs for Thanksgiving so I decided I was gonna make some Texan
13:43
soup chair fries. We've had them before but they're yummy. Well they are. So let's order
13:52
This looks pretty good. Okay, so after your wiring's in, to install this, you slide this up in that groove, not too far or it won't fit on the bottom
14:05
So, there's a happy medium. There it is right there. And the bottom screws will go in place Now mine does have a little road rash because I had to modify it to fit But no more road rash than the car has And then you take and you side this in
14:30
there we go with all that and we can install the final piece and it is done now let's see if it
14:51
works and there we go didn't set the time or anything got smudges all over the
15:04
screen but it's installed. Okay guys so this was just the radio install if y'all stay tuned for next week we're going to show you how to use it and all the features it has
15:18
It basically works like an Android phone. So if you have an Android phone, you'll pretty much know how to do all the basic settings of Android
15:29
And then you have the addition of a radio. And the radio, it's basically a plug-in, which looks pretty nice
15:37
So stay tuned for that video. It, like, literally turned the car to look more newer, like more of an up-to-date car, you know, with the touchscreen
15:48
and everything. It's really nice. It is really nice and I know we didn't install the USB or
15:56
anything like that. We're going to look at that in maybe in the future because we just don't want
16:02
USB wires hanging around. That would look horrible. And the backup camera, we didn't use that at this
16:08
time. And also we did use the steering wheel function, which has a handy programmable steering
16:15
wheel function so you can program it to any button you want
16:19
So the buttons on the steering wheel, when you make them connect, you can program
16:23
them and do whatever function you want on the radio. That's nifty. Nifty? That's a new word
16:32
I didn't know about it from my huggy. Nifty. It's radical, man
16:41
Oh gosh, let's not go there. But also, if you got hungry listening to me talk through all this, go check out our blog
16:53
This girl makes some delicious eats. And also, we make videos of them too, so you can see how she makes them
17:06
Wow, that was loud. What was that? I don't know. Fireworks. That was fireworks
17:12
It was. Woo hoo! So we got fireworks going on, I know it's coming up on the new year that dates this video
17:20
but we're gonna get back to it. Oh yeah, there's, yeah. We gotta go see where this is at
17:32
And with that, like the video, subscribe to our channel, and y'all please take care. Okay
17:41
We gotta go check this shit out. Y'all stay tuned. I'll do
17:46
Refreshment time. Just a little bit. When you strip these off, like here, they've already been pre-cut so you can just, basically
18:07
basically all you have to do is hold on to it and you can pull it off right where
18:14
it breaks. I say that and this one didn't do it. Look at that
18:20
Do I have to hold this for the next time? No. Cut! We have to redo all that. What? No. Because I talked over the top of you